-
You can use socal TEC routes by route identifier.

Enter the TEC route code as you would an Airway SID or
STAR and Fsbuild will create a flight plan with the entire
TEC route routing.
BACK TO TOP
- Set default fs2002 departure position.
You can pre-set the FS2002 aircraft start position in the
fsb_pref_rwy.txt file.

The 4th column can be used to specify the 'departure_position'
option in FS2000/02's .pln file. By default the Departure
runway in column2 in inserted by Fsbuild as the 'departure_position',
if there is an entry in column 4 it will supercede column
2 as the 'departure_position'. So you can enter a gate
or ramp position in FS2002 if you wish. This departure
position should actually exist within your MSFS scenery.
AFCAD and other FS2002 scenery add-on parking and ramp
positions will be recognized just fine.
BACK TO TOP
- Options to improve startup time and reduce
the resource usage of Fsbuild2.
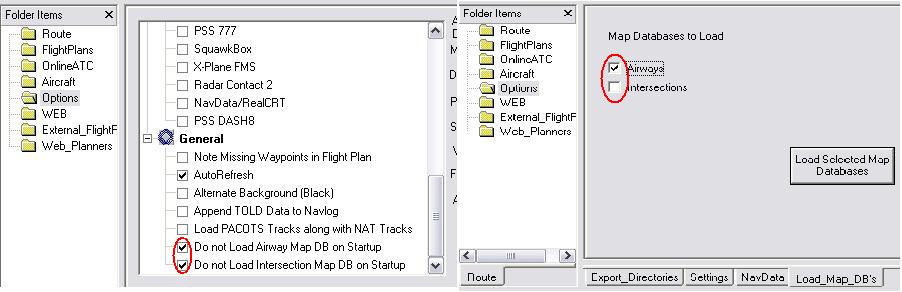
The 'do not load' airways and intersection map databases
will result is less system resources being used by Fsbuild2.
With both options set the resource usage is cut by 50%
which may be usefull for low end system users (ex systems
with less than 384 MB Ram). Having this option set also
results in a faster program startup time. The trade off
for this settings is if the Airways databases are not
loaded the autogenerator and plan mode features are disabled.
If only the intersections Map database is not loaded then
the autogenerator will be enabled but Plan mode will still
be disabled. You can reload either or these databases
should you need them at any time by going to the 'Options/Load
Map DB's tab', and selecting the one or both Map databases
to load, and pressing the 'Load selected Map databases'
button. When these databases are loaded the Plan mode,
and autogenerate buttons will be re-enabled. Another way
to shorten the startup time is to use a small default
Flight Plans file. By default about half the startup time
is spent loading the 10,000 or so default stoired flight
plans. In the Fsbuild2.cfg file you can use the 'DEFFPCATEGORY'
parameter to set the default Flight Plans list to load
on startup. [FSBUILD] ... DEFFPCATEGORY=myflightplans.txt
BACK TO TOP
-
A Second 'Build' for including FSMeteo winds aloft data
not necessary if a copy of the Fs2002 file for that Flight
Plan already exists in FS2002 folder. Normally To include
the FSMeteo winds aloft data into Fsbuild's Flight plans,
two builds are required. The first build to export the
Flight Plan in FS2002's .pln format. And the second build
to include the winds aloft data after FSMeteo processes
the FS2002 .pln file. If the FS2002 .pln file for the
exact same flight plan already exists in your FS2002 flight/myflts
folder then the first build to export the .pln file is
not necessary. Start with FSMeteo's Import Planning function,
then do the one build to include the FsMeteo winds aloft.
BACK TO TOP
- To force a step climb according to RVSM
flight levels

To force Fsbuild to create step climb via RVSM flight
levels, select the 'Use RVSM Flight Levels' 'Build Options'
menu item prior to building the flight plan.
BACK TO TOP
- Force a page break on a specified line
in the Navlog when exporting the Navlog to .pdf format.

You can force a page break on a specified line in the
Navlog for the export to .pdf format, by manually entering
a series of hyphens '----------' at least 10 consecutive
hyphen '-' characters are needed for force a page break.
After entering the page break string '----------' export
the navlog to .pdf format, and a page break will be inserted
on the line you entered the page break string on.
BACK TO TOP
-
Double click on the flight plan table to build a route
An alternate to pressing the route is to double click
on a stored flight plan in the stored flight plans table.
Double clicking on a stored flight plan in the table has
the same effect as pressing the 'Build' button.
BACK TO TOP
- Autogenerating routes from the batch Build
Process.
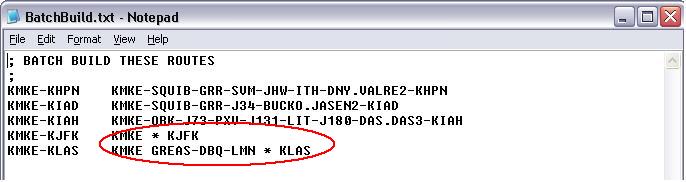
For the 'Batch Build Current Category' 'File' menu option.
Routes can be autogenerated in batch mode by inserted
the wildcard character '*' between the departure and destination
airports. Note: auto-generated routes will take signifcantly
longer to create, it is advised that you keep the category
size relatively small for batch builds.
BACK TO TOP
- Use of non-standard SID/STAR names in
the coded/ATS flight plan.

The SID/STAR Translation table, allows the use of non-standard
SID/STAR names in the coded flight plan which is then
translated to a value that will match what is actually
in the database for that SID/STAR. Used mostly with some
FAA preferred IFR routes which sometimes use the longer
name for a SID/STAR. But character string can be tranlated
to a SID/STAR name that is actually used in the Fsbuild
SID/STAR database.
Example:

PULLMAN_STAR PMM_STAR Will convert the text 'PULLMAN_STAR'
to 'PULLMAN_STAR'. The underscore character '_' is required
in lieu of spaces.
BACK TO TOP
- Display Vatsim ATC list background by
voice / non voice positions.

When retrieving the list of active VATSIM ATC positions,
the background color of the table can be set to show a
blue background for voice positions, and a yellow background
for non voice positions. In the Fsbuild2.cfg file, below
the '[STARTUP]' section, enter the 'ATCBYVOICECTRL' startup
code, and this option will activate. Fsbuild will only
recognize a position as voice if its position ID contains
the '_V_' string. Note: Not all Vatsim divisions use the
'V' standard for voice positions, this seems to be particularly
true in Vatsim's European sectors.
BACK TO TOP
- Customize the Fsbuild .pdf Navlog with
your Virtual organization's name and logo.

In the Fsbuild2.cfg file below the [FSBUILD] section, you can enter the Navlog customization parameters.
[FSBUILD]
...
...
NAVLOGTITLE=WESTWIND AIRLINES
NAVLOGIMAGEFILE=wwlogo.jpg
NAVLOGIMAGEBOTTOM=780
NAVLOGIMAGELEFT=280
NAVLOGTEXTTOP=750
NAVLOGIMAGEFILE=wwlogo.jpg
The very top of the .pdf page is position 820, the very bottom of the page is position 0. The very far left of the page is position '0'
NAVLOGTITLE=WESTWIND AIRLINES // Text of Navlog title (default is 'Fsbuild Flight Plan ')
NAVLOGIMAGEBOTTOM=780 // Place of Bottom of Image at position 780.
NAVLOGIMAGELEFT=280 // Position from the left edge of the page to place the Image, '0' is the very far left edge of the page.
NAVLOGTEXTTOP=750 // Top position Navlog text is to begin at (position 750, just under image) .
NAVLOGIMAGESCALEX=10 // Increase Image Width by 10%
NAVLOGIMAGESCALEY=-10 // Reduce Image Height by 10%
NAVLOGIMAGEFILE=MyLogo.jpg // Image file can only be .jpg format, and must be located in the Fsbuild2/Images sub folder Normally you'd want the x/y scaling to be the same value if you want the image to maintain its aspect ratio. But the X/Y scaling allows to reducing or increasing the size of the image within the .pdf file. It will probably take a little adjusting to get your logo displayed the way you want and the Navlog text to display in the right spot below it.
BACK TO TOP
- Manual entry of the cruise altitude.

For manual entry of the cruise altitude 3 digits can
be used '370', or the 'FL' notation can be used both to
represent the cruise altitude in thousands.
BACK TO TOP
- Route waypoints highlighted by pressing
the CTRL key.

When the 'Route' tab is selected, after a Flight Plan
build you can hold the mouse over the flight plan waypoint
on the map, press and 'hold' the CTRL key for approx 1
second, the Flight Plan waypoint will highlight in red,
and the route waypoint table will have that waypoint selected.
This same function is also available on the 'Online ATC
page'. Hold the mouse over the ATC position on the map,
press and 'hold' the CTRL key for approx 1 second. The
ATC position and the ARTCC boundary will highlight in
red, and the ATC position table in the top pane will scroll
to that position and select the row. On the ATC page this
feature is disabled when the Airports button ('A') is
in the down position.
BACK TO TOP
- Set Autogenerator's route combo limit.

The autogenerator by default has a route combination
limit so that the wait for it to create a route isn't
too long. Most of the time the 2nd or the 3rd best route
may fall within the combination limit and the generated
routing will be plently good enough. But sometimes its
probably better to allow it to go though more combinations
and produce a better route. Depending on your system you
may decide to favor speed over route accuracy or visa
versa. On the options/Settings page there is a box labeled
'Autogen Route Combo limit' in which you can set the limit
of route combinations for the autogenerator to go through
to find the best route. The default is blank, when left
blank the combo limit is around 1400, but that is for
routes above 2000 nm, for shorter routes the combination
limit is smaller by default bssed on the route distance,
The minimum limit is 100. In general increasing the combo
limit will result in better autogen routes, but they will
take longer to generate,and visa versa.
BACK TO TOP
- Static Concorde North Atlantic Tracks
S_MIKE, and S_NOV, S_OSCAR

Concorde North Atlantic Tracks Sierra_..Mike, November,
and Oscar can be used in your flight plans. In plan mode
they will display with the 'static' Tracks are retrieved.
Track Sierra November will display on the 'East' list,
and Track Sierra Mike, will display on the 'West' List.
Track Oscar displays on both the East and West list, so
Track Oscar will display on the airways list twice when
in plan mode. In the Flight Plan box the Concorde Tracks
cannot be referred to as their real world codes of 'SM',
SN', or 'SO'. Because there are several NDB's in the Fsbuild-2
database with those two letter codes FSB2 would never
be able to distinguish between the Static Concorde Track
ID and the NDB ID's. So they can be references as 'S_MIKE,
S_NOV, and S_OSCAR'. Example Usage... EGLL...5015N S_MIKE
4750N...KJFK The From,Via,To usage in plan mode is supported
for these Concorde Tracks, and they will display on the
map when selected in plan mode. See the waypoint list
for these tracks in the 'StaticNATracks.txt' file.
BACK TO TOP
- The Navlog file is copied to X-Plane
6 xplane/output/flight plans folder for viewing inside X-plane.

When the export to X-Plane FMS option is selected a copy
of the Navlog is copied to your X-Plane/Output/Flight
Plans folder. Then when in X-Plane load the Navlog as
a text file (it will be named in the format Dep-Dest.log).
The Output/Flight Plans folder must exist in the X-Plane
directory tree, for this feature to work, if it does not
, you will need to create this folder.
An example of what this output will look like in X-Plane
6:

BACK TO TOP
- Set Default Taxi-Out times.

In Fsbuild2 the default taxi-out time for an airport
can be set in the 'DepTaxiTimes.txt' file. When this settings
is made whenever this airport is selected as the departure
airport, Fsbuild will automatically set the taxi time
and calculate the taxi fuel according to this time. During
each build FSBuild2 looks in the 'DepTaxiTimes.txt' file
for the Taxi time in minutes for the Departure airport,
if the Taxi fuel box on the aircraft page is empty prior
to the build. The format of the file is straight forward
the first column is the airport ID, and the second column
is the average Taxi-Out time for the airport. This option
is not used by Fsbuild2 if the selected aircraft does
not have its 'TaxiFuel=' param in the form of 'TaxiFuel=fuelburn/mins'
(see the Data Files document for more details).
BACK TO TOP
- Fuel burn settings

The Fuel values can be entered as either a single hard
value, a time, or a percentage. To use 'Time' prefix the
value with a colon ':' (ex: ':10' eauals 10 minutes).
To use a percantage prefix the value with a percent sign
'%' (ex: '%10' eauals 10 percent). The percentage is a
percentage of the total trip fuel. These settings depend
on the fuel burn settings of the aircraft in the 'fsb_aircraft.cfg'
file. See the 'Data Files' document for details on this.
BACK TO TOP
- Set the size of the 'Title' column on
the Stored Flight Plans table.

The with of the 'Title' column is set small by default,
to support low resolution users. This field can be expanded
by setting the 'FPTITLESIZE' in the Fsbuild2.cfg file.
[FSBUILD] ... FPTITLESIZE=3000 This size is in pixels,
the default size is '1150' so use a number larger than
that to expland the title field. If a number entered is
lower than 1150 the default of 1150 is used. This option
can only be set by editing the .cfg file, there is no
menu or config option for this in the user interface.
BACK TO TOP